

Installation #
First you need to unrar the archive with your favorite unpacker. You’ll now have WaxElectribulator.jar and other files and folders. !!! Be sure to have java 1.6 installed !!!
Configuration #
You can edit the config.properties optionnaly to assign the MIDI channel if your EMX is not configured has synth part is on channel 1 and so on :
_ModulateurPauseTime=25_The delay beetwen CC are sent to the electribe (25 ms seems fine for me).
! Take care that a too low value will increase MIDI bandwith. If too much data are sent, somes of them are lost for the EMX so you’ll notice bug and errors when sending presets, and when playing with VCA !
_SynthOutputChannel=8,9,3,4,5_The 5 midi channel of the EMX synth parts.
Launching application #
You can use :
Go.batif you’re under windows to launch it automatically or simply click on WaxElectribulator.jar.java -jar WaxElectribulator.jarif in console. (If using intensively add -Xms128M -Xmx256M to the java command)
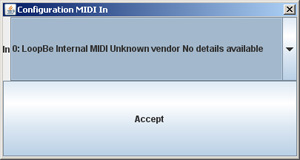
First midi configuration #
The 3 First Dialog’s are the midi configuration, You’ll need to configure the :
- INPUT where KEYBOARD (or SEQ) IN is.
- OUTPUT where electribe IN is.
- INPUT where remote controller is (optional).
The 3rd input can be EMX or another midi controller used to control Electribulator
Principles #
Working as an external modulator and a note redispatcher. The program receive one note, select an inactive synth part and send the note. Enabling a polyphony of 5 voices with some modulations (VCA, VCO) that aren’t feasable directly with the EMX.
You need a note source like a midi keyboard, hardware sequencer or software sequencer (using a midi loop device like midyoke or loopbe1) configured on channel 1 to 9.
All notes received on channel 10 will be transmitted as received (For all drum part that are generally on chan 10).
All modulators can be assigned to each Midi CC of the EMX (level, filter cutoff, reso, all knobs of the electribe…).
An recent option allow you to disable the note dispatching mechanism. Letting you keep monophony but keep the modulators working to enable very nice sounds too.
Also an arppegiator can be enabled to play sequence of notes while you pressed on a single note.
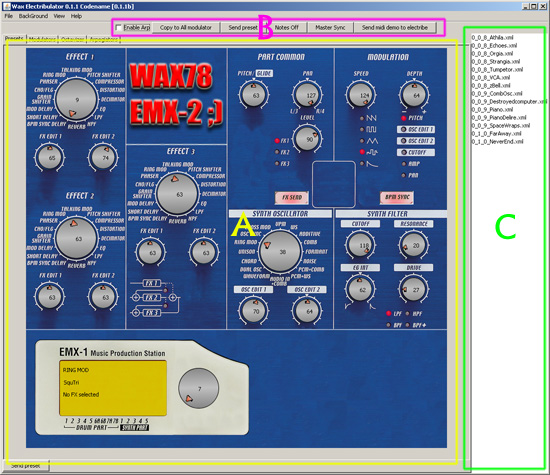
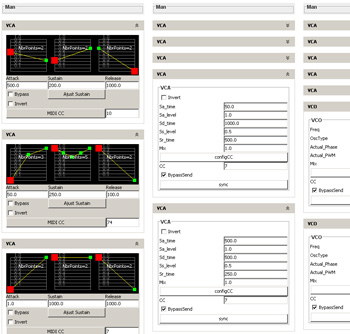
GUI - Main Window #
Here’s the main window. With three important parts :
- A. This is the main zone where you can edit all presets, all modulators, Octaviser and the Arpegiattor. Each tabbed pane is a control zone.
- B. This is the main command buttons.
- C. That list contains all projects inside the folders. One click load the projects and send the preset to the electribe immediatly.
Comand Buttons: #
- Enable ARP : Enable the arpegiators. When a note is received by electribulator, electribulator will send a sequence of notes editable by user.
- Send Preset : Send all presets command to the electribe EMX. (It can happens sometimes that some of the command inside the sequence sent to be lost, so a need to push 1 or 2 times on this button can solve it).
- Notes Off : Send a note OFF to all notes of the EMX in case of problem.
- Master Sync : Used (but unusefull) to send a manual sync to each modulators.
- Send Midi Demo : Has the name said, send 2 notes on each voice of the electribe to see if every midi connection are good.
GUI - Each Panes without details. #
Preset
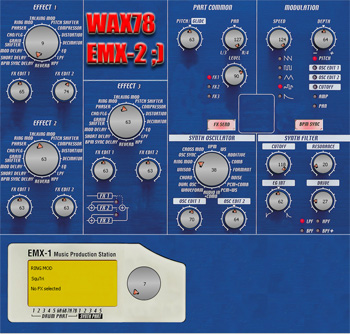
The first part of the GUI. The “Sound editor”
Similar to the real machine. This will help you to configure the EMX in few mouse clicks (or using the EMX itself has midi controller).
It will send the preset you change to each 5 synth PARTS.
There also a fake LCD display emulator to help when turning knobs.
Knob can be double clicked to put a textual value.
Left Right PgUp PgUp Home end can be used too to control knobs.
Modulators
The nicest part to my eyes :
- 3 new VCA (ASR with loopable sustain acting as VCO) assignable to each midi CC of the elecribe.
- 3 old VCA (ADSR) assignable to each midi CC of the elecribe.
- 4 VCO (sin, sqr, saw, tri,…) assignable to each midi CC of the elecribe.
All these modules can be SYNCed or not when note on.
Chords

That pane enable you to make Chords when a note is received. (Ugly system for now).
Arpegiator
Here you’ll find 5 arp. One for each “voice”. If enabled, the arpegiator will wait for a note. When received and until released, the arpegiator will send the sequence of notes.
Drum Presets
-Nothing to display now -
This panel represent the DRUM configuration for the EMX.
It enable you to choose each sound of each DRUM PART and configure theses sound preset like the original preset part.
Very useful to configure the DRUM part in few clicks. Electribulator allow to save and load these preset and send it directly to the electribe like the other original preset panel.
GUI - Presets #
It should be easier enough for you to let me not writte something on it right now ;) (joking)
GUI - Modulators #
VCA module #
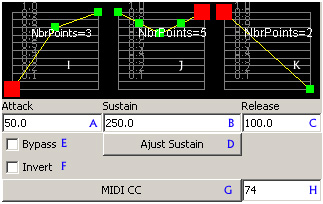
Here’s a “complex” VCA (Voltage Controler Amplifier) editor assignable to one CC for each Channel seperatly (when monophonic is used instead of polyphonic)
- A) Attack time of the VCA.
- B) Sustain time (for one loop). You can disable Sustain by putting 0 here.
- C) Release time.
- D) Enable to adjuste first and last node of the Sustain graph to equal last node of attack and first node of Release.
- E) As the name said, bypass that VCA.
- F) Invert the slopes signal when outputing VCA value.
- G) Choose the CC target.
- H) Same but by hand ;).
- I) Editable slope for the Attack part.
- J) Edit. slope for the Sustain part.
- K) Edit. slope for the Release part.
All slope are editable by clicking mouse. Right click on it to have a popup menu to load/save, make mirrors etc ….
Insert and Delete keys on node to add/remove it.
VCO module #
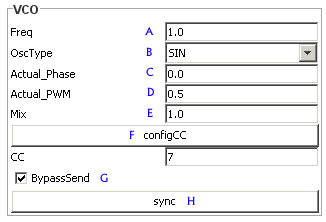
Here you got a VCO (voltage controlled oscillator) that will produce a sinusoidal, tri, square, noise, etc signal to modify a CC. It works like the modulation module of the EMX but with some more features.
- A) Frequency.
- B) Oscillator type (sin, sqr, tri, saw, …)
- C) Phase of the signal
- D) PWM size if osc type is pwm (0 to 1)
- E) Used to assign CC friendly.
- F) Used to assign CC manually and barbarian.
- G) Bypass the generation of signal. (output should be 1.0)
- H) Sync that OSC manually. (It’s normally SYNCed automatically when a note is received for this channel).
GUI - Chords #
It enable you to play 1 or 5 notes with only one finger at time.
By checking Boxes on left you will sent more than a note at a time.
If you enable the first box and the second box (with +12) you’ll have the note you played AND
the note you played + 12 notes (+1 octave).
WARNING - This is subject to change radically in a near future as it’s not really a true chords maker …
WARNING - Don’t enable of disable checkbox while playing note or you’ll probably have a note that won’t end :)
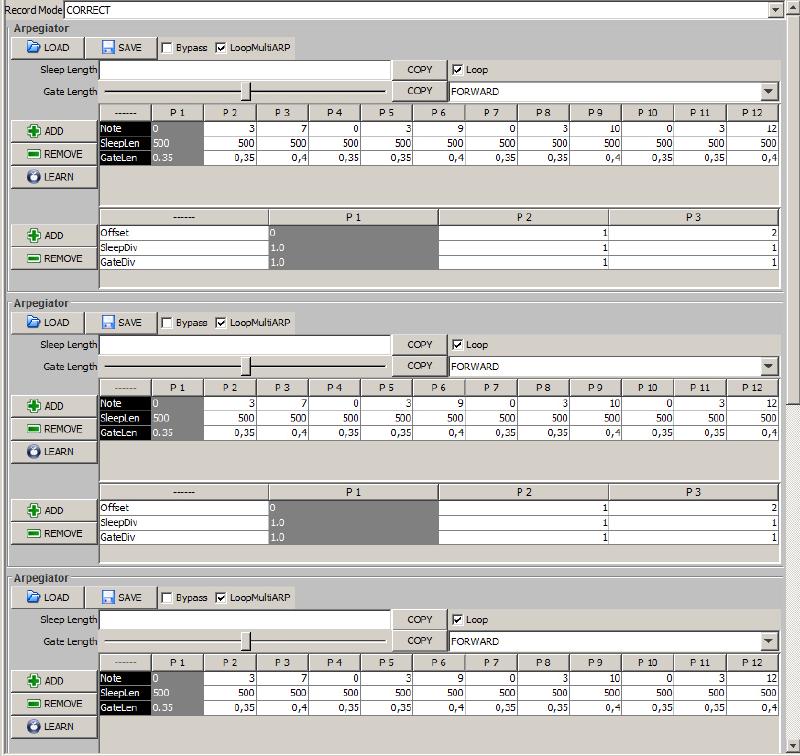
GUI - Arpegiator #

This little module enable you to play a sequence of notes when receiving a note and it’s pressed.
It’s turning GREEN when activated by a note ON.
- Load : Used to load an xml preset to this arp.
- Save : Used to save the preset of this arp to an xml file.
- Bypass : That normally will turn off arpegiating. So that arp will simply send the note and don’t play the sequence
- Sleep Length : Enter a value then push COPY to copy the value in each Cells of the table.
- Gate Length : Same for the Gate Length.
- Loop : Does this arp have to loop infinitely or stop playing at the end of the sequence.
- Forward : Change the way the sequence is played. FORWARD or FORWARD then REVERSE
- Add : Add a column to the table.
- Remove : Remove the last column of the table.
- Learn : Press that button to enable sequence learning. Arp should become RED colored on the background letting you know it learning. You just have to play a sequence of notes and it’ll stop learning when reaching the sequence’s amount of note.